Processing Your Compost for a Finished Product

The compost demonstration area at The Environmental Center is towards the back of the Kansas Ave Learning Garden. We were recently the recipients of a beautiful Little Free Library, installed on an old tree stump near the compost area. This was the perfect excuse to revamp this whole area to make it more attractive and user friendly. That involves moving bins, and if you’re going to move bins, well you might as well see if there’s any good compost in there to use. After a tough winter here in Central Oregon – with many weeks of not even feeding any fruit and veggie scraps to any of the compost bins as they were buried under snow – it was finally time to open things up and see how they look. While the top of the bins often still had unprocessed food scraps at the top, digging just beneath the surface revealed a ton of red wiggler worms – even in bins where we hadn’t put any – and well processed compost. Here’s how we deal with it so we have a nice finished product to spread.
TIP – Unless it s a tumbler/spinner kind of bin, add red wiggler worms to your bin, ASAP. Make sure they get regular food, and they don’t dry out in the summer heat. Come back to this blog post next spring.
Now, in order to get to the good stuff, and get it without the worms, I had to do a few steps. They are quickly illustrated in the pictures below, but I’ll explain the process too.
Lay out a tarp next to your bin, and scoop it out, lift if off or dump out your compost bin onto the tarp. You can immediately scoop off bigger things like dried out paper or corn cobs, dried out avocado shells and pits, some uncrumbled eggshells, etc. These tended to be on top and around the edges where there was less moisture and less worm activity. Put them either back in the empty bin, or in a new spot or another compost pile that’s still working.
TIP – Find something you can use as a screen, not like a window screen but more like a grate, that can sit over a wheelbarrow. ReStores are good locations for these types of things.
If you have the space, pile the compost in pyramid piles on the tarp. Even one big pile will work to start. Worms like it dark and will burrow down low to avoid the sunlight. This allows us to scoop off the top relatively easy. Grab handfuls of compost, scan for worms, if you don’t see any then drop it onto the grate. Designate where you are putting your worms, like an empty bin, another compost pile, or even a temporary bucket. You can go relatively fast here – its okay if some worms are transferred to your garden bed – though keep in mind if you have kids working with you on this part, they will meticulously look for the worms, without really harvesting the compost. When you get to the clump of worms you can easily put them in their designated spot, and rebuild pyramids of compost so you can keep scooping off the top. (Eventually you’ll be at the bottom where most of the worms are, and at that point you just gather all that material to kick off your new round of composting.)
When your grate looks full, stop adding and scan it for any worms that you missed the first time. Then you can shake the grate, run your hands back and forth, anything to help break up the chunks of compost so mostly the little stuff gets through and the big stuff doesn’t. Knock off the top of the grate back into the new compost pile to continue decomposing. Keep doing this until your wheelbarrow is full. The fun part? Spreading it all out onto your garden beds. I know where I’ve already spread compost by looking for the bits of crushed eggshell pieces 🙂
You can keep going in rounds like that, or do it in spurts. Last week when I photographed this process, I did this process long enough to fill one wheelbarrow, which is a decent amount of compost to spread on garden beds. I wrapped the rest of the exposed pile in a tarp to keep it dark and moist until I have time to finish processing this week.
-
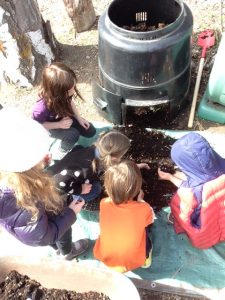
- Kids help with initial sort
-

- Good stuff is at the bottom
-
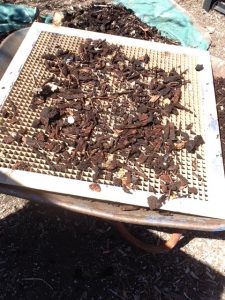
- All that’s left is the big stuff
-
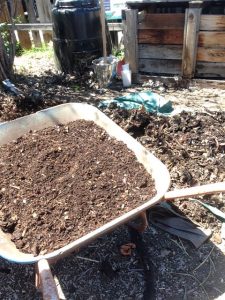
- The wheelbarrow is full